- Published on
Introduction to Workbox — A Service Worker Library
- Authors

- Name
- Gbenga Oni
- @gbxnga
Learn Hand-On AWS Cloud EngineeringHERE

With new technological introductions like the Service Worker, Progressive Web Apps are taking the future of web apps to places we never imagined.
The Service Worker, a script that runs in the background of the web browser, separate from the webpage, helps implement offline functionality to web apps, giving the users offline experience like a native app would.
As described on their official website, “Workbox is a set of libraries and Node modules that make it easy to cache assets and take full advantage of features used to build progressive web app’s.”
Workbox automates and abstracts the implementation code you would usually write in your Service Worker script. It takes care of the caching, pre-caching and serving of files according to instructions given through its API.
Workbox :
- Creates an offline first experience for your website
- Improves site performance by serving files cached with various caching strategies
In this article, you will use the workbox library to build offline capable Progressive Web Apps.
You will learn how to:
- Integrate the workbox library into your Service Worker
- Add routes to your service worker using workbox
- Use the predefined caching strategies provided in the workbox library
STEP 1: Create a folder called workbox-pwa. Our final folder structure will look like this:
workbox-pwa
├── README.md
├── index.html
├── sw.js
└── src
    └── Images
    └── Index.js
    └── Index.css
STEP 2: Create an index.html file. Here, we will define the basic page structure and include a src/index.js script:
<html>

<head>
	<title>Workbox-PWA</title>
    <meta charset="UTF-8" />
    <script src="https://ajax.googleapis.com/ajax/libs/jquery/3.3.1/jquery.min.js"></script>
    <script src="https://stackpath.bootstrapcdn.com/bootstrap/4.1.1/js/bootstrap.min.js" integrity="sha384-smHYKdLADwkXOn1EmN1qk/HfnUcbVRZyYmZ4qpPea6sjB/pTJ0euyQp0Mk8ck+5T" crossorigin="anonymous"></script>

    <link href="https://stackpath.bootstrapcdn.com/bootstrap/4.1.1/css/bootstrap.min.css" rel="stylesheet" integrity="sha384-WskhaSGFgHYWDcbwN70/dfYBj47jz9qbsMId/iRN3ewGhXQFZCSftd1LZCfmhktB" crossorigin="anonymous">
    <link href="src/index.css" rel="stylesheet">

    <link href="https://fonts.googleapis.com/css?family=Indie+Flower" rel="stylesheet">


</head>

<body>
	<div id="app"></div>

    <script src="src/index.js"></script>


</body>

</html>
STEP 3: In the src/index.js script, we will register our Service Worker script located in the root folder and also populate the index.html page with content. The index.html page will include an image, this will help test the workbox resource caching strategies.
// Check that service workers are registered
if ("serviceWorker" in navigator) {
    // Use the window load event to keep thepage load performant
    window.addEventListener("load", () => {

        navigator.serviceWorker.register("sw.js");
    });
}

document.getElementById("app").innerHTML = `
<div class="container">
<div class="row">
<div class="col-md-12">
<h1 class="text-center heading">Hello Workbox-PWA!</h1>
<div>
  <img  class="img-banner" src="src/images/workbox-pwa.png"/>
</div>
</div>
</div>
</div>
`;
STEP 4: Create a Service Worker file in the root of the site and name it sw.js.
console.log('new service worker installed')
STEP 5: Now that our Service Worker has been installed, we will import the workbox.js library from the CDN to the Service Worker script. This will provide the workbox namespace in your Service Worker, giving you access to all of the workbox modules.
console.log('new service worker')
importScripts('https://storage.googleapis.com/workbox-cdn/releases/3.2.0/workbox-sw.js');

if (workbox) {

  console.log(`Yay! Workbox is loaded successfully 🎉`);

}
else {

  console.log(`Awww! Workbox failed to load 😬`);
}
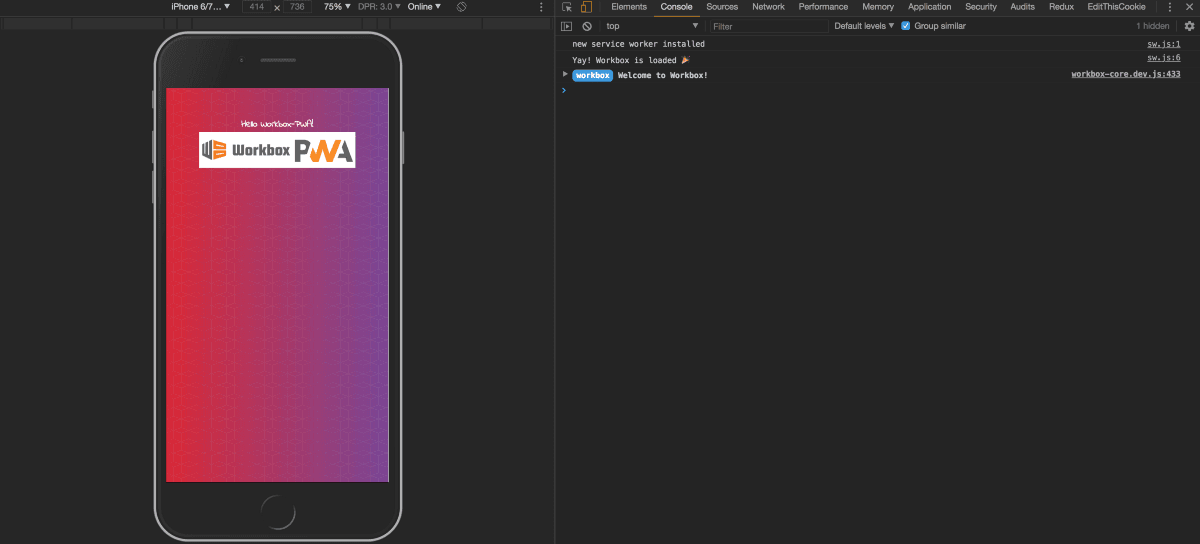
You should get a success response like this in your console

Now that our Service Worker is installed and workbox library is imported successfully, lets add routes to the Service Worker using workbox.
STEP 5: We will cache all javascript and css files needed by the page using a regular expression that matches all urls ending with .js or .css.
The route in workbox is a combination of two functions; The first is a _matching_function that determines if the route matches a request; The second, a handling function that handles request and returns a Response.
The workbox caching strategy used for the javascript files is a _Network First_strategy, that is it sends request to the network first and only falls back to the cache is the request fails or an error occurred.
workbox.routing.registerRoute(
  new RegExp('.*\.js'),
  workbox.strategies.networkFirst()
);
We will use a Stale While Revalidate caching strategy for our css files, that is request for css files will be served from the cache and after that an update is requested from the network to be served on subsequent request.
workbox.routing.registerRoute(
  // Cache CSS files
  /.*\.css/,
  // Use cache but update in the background ASAP
  workbox.strategies.staleWhileRevalidate({
    // Use a custom cache name
    cacheName: 'css-cache',
  })
);
STEP 6: We will cache all images requested by the site by registering a route that matches when requested resource(s) ends with a valid image extension.
The caching strategy employed here is the Cache First strategy, which checks if the image being requested is available in the cache first, if not, it fetches the image from the network.
We will name the cache image-cache and include a workbox expiration plugin, setting maximum entries, through the maxEntries property of the argument, to 30, that is only 30 images can be stored in the cache as older entries will be removed for newer ones. The maxAgeSeconds property that specifies the maximum length of time an image will remain in the cache is set to one week. This removes any image that’s been in the cache for more than a week.
workbox.routing.registerRoute(
  // Cache image files
  /.*\.(?:png|jpg|jpeg|svg|gif)/,
  // Use the cache if it's available
  workbox.strategies.cacheFirst({
    // Use a custom cache name
    cacheName: 'image-cache',
    plugins: [
      new workbox.expiration.Plugin({
        // Cache only 30 images
        maxEntries: 30,
        // Cache for a maximum of a week
        maxAgeSeconds: 7 * 24 * 60 * 60,
      })
    ],
  })
);
STEP 7: To enable a full offline experience on the app, we will cache the index page so its still accessible even when the user is offline.
We did something a little different here: Although Workbox comes with helpers that perform the matching and handling function for you, it also allows for writing custom matching and handling functions. So we will use a custom matching function in registering the index page route.
The matchCb function takes the url and event as arguments and returns Trueif the pathname matches the root of the site (The root path of the site, obviously on localhost, is ‘/workbox-pwa/’. You may use ‘/’ while in production if that equals the root of your site), otherwise it returns False.
Note: Your custom matching function must return a truthly value (True or False) and all works must be synchronous as all asynchronous works are prohibited. Your custom handling function on the other hand must return a Promise that resolves to a Response.
Our custom matching function — matchCb — is then passed as first parameter to the workbox’s registerRoute function. The Network First strategy is used here.
const matchCb = ({url, event}) => {
  return (url.pathname === '/workbox-pwa/');
};

workbox.routing.registerRoute(matchCb, workbox.strategies.networkFirst());
Now our Service Worker is ready for use…
Lets add a little design to the page by including an external css file src/index.css. It will also serve as needed resources to be cached by the Service Worker through the workbox library.
body{
    margin: 0;
    color: white;
    background: url(https://blackrockdigital.github.io/startbootstrap-new-age/img/bg-pattern.png),linear-gradient(to left,#7b4397,#dc2430);
}
body:root {
    --blue: #007bff;
    --indigo: #6610f2;
    --purple: #6f42c1;
    --pink: #e83e8c;
    --red: #dc3545;
    --orange: #fd7e14;
    --yellow: #ffc107;
    --green: #28a745;
    --teal: #20c997;
    --cyan: #17a2b8;
    --white: #fff;
    --gray: #6c757d;
    --gray-dark: #343a40;
    --primary: #007bff;
    --secondary: #6c757d;
    --success: #28a745;
    --info: #17a2b8;
    --warning: #ffc107;
    --danger: #dc3545;
    --light: #f8f9fa;
    --dark: #343a40;
    --breakpoint-xs: 0;
    --breakpoint-sm: 576px;
    --breakpoint-md: 768px;
    --breakpoint-lg: 992px;
    --breakpoint-xl: 1200px;
    --font-family-sans-serif: -apple-system,BlinkMacSystemFont,"Segoe UI",Roboto,"Helvetica Neue",Arial,sans-serif,"Apple Color Emoji","Segoe UI Emoji","Segoe UI Symbol";
    --font-family-monospace: SFMono-Regular,Menlo,Monaco,Consolas,"Liberation Mono","Courier New",monospace;
}

img.img-banner{
    width:100%
}

h1.heading {
    margin-top:20%;
    color:white;
    font-family: 'Indie Flower', cursive;
}
The final page should look something like this if you’ve followed the above instructions to the letter.

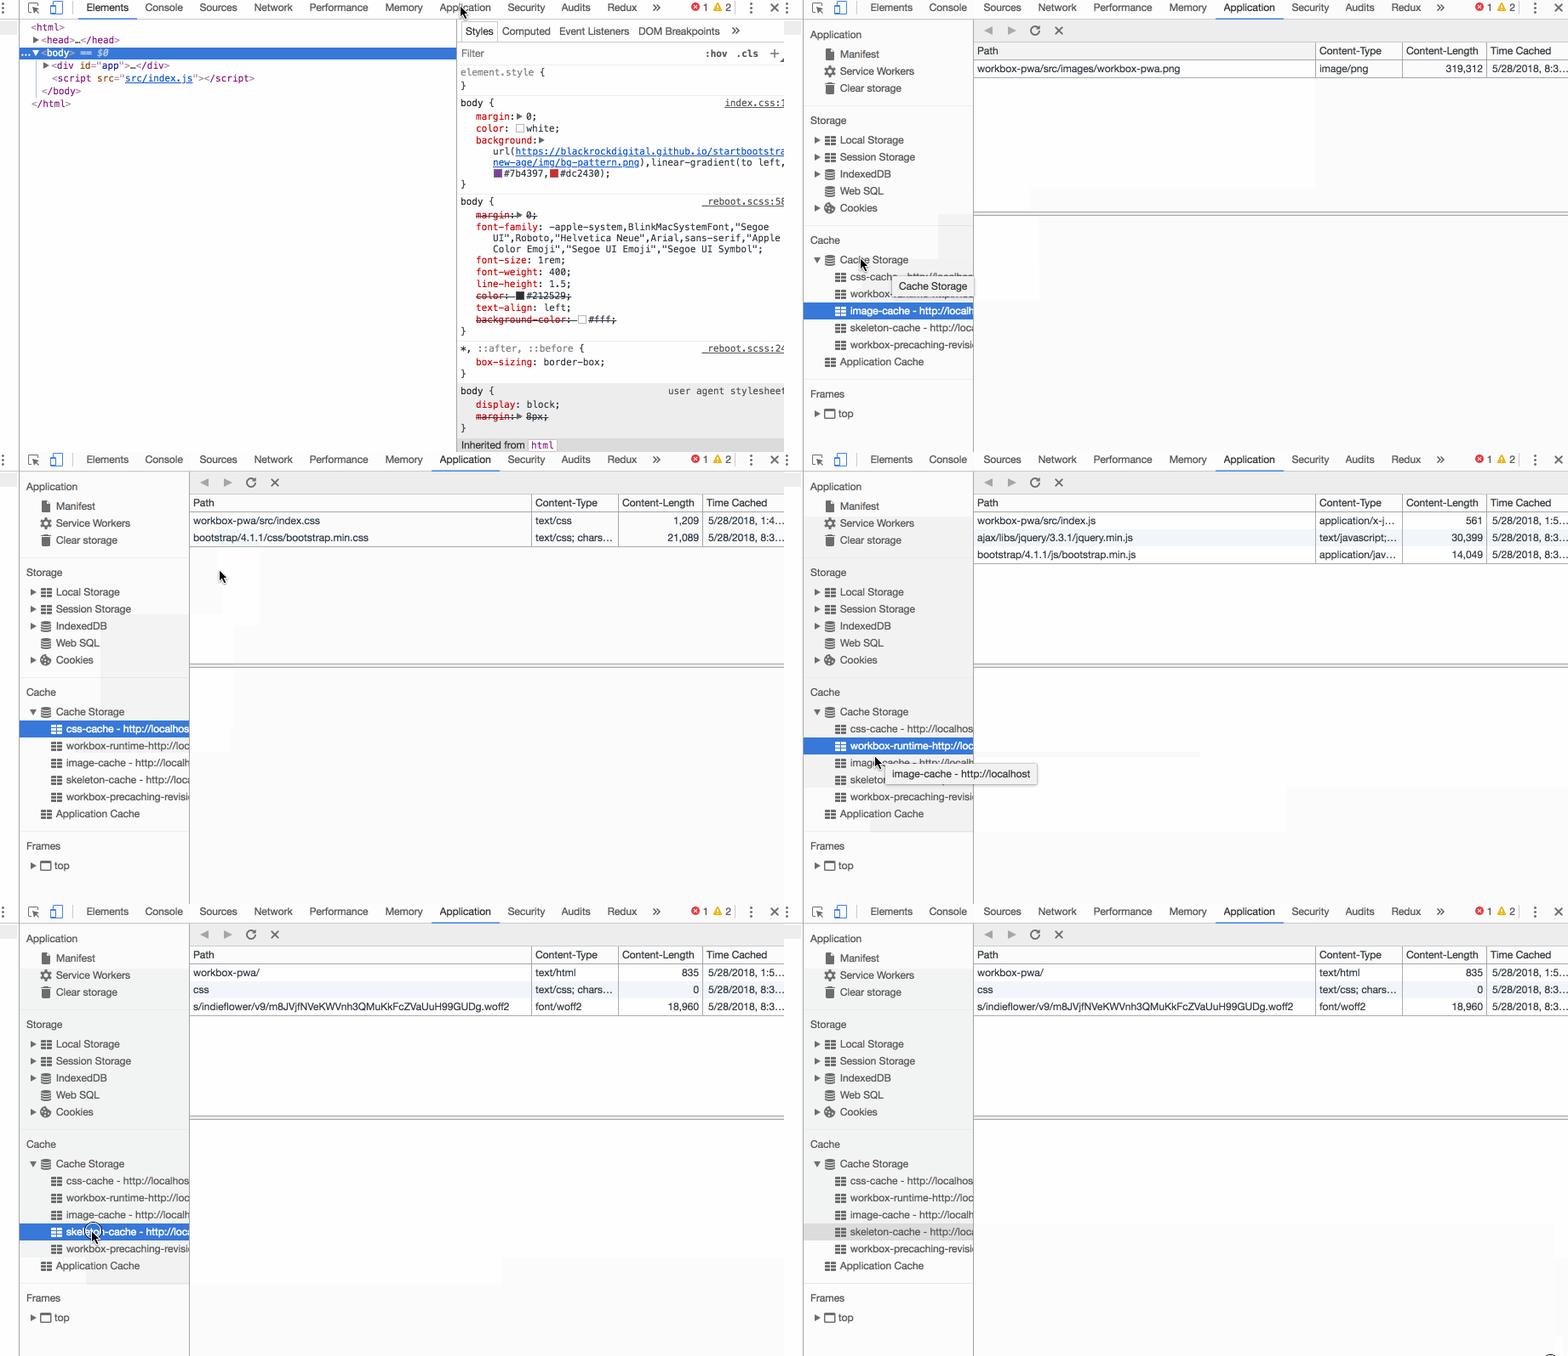
Navigating to the Application tab in Chrome Dev Tools and clicking on ‘Cache’ at the bottom-left corner shows a list of cache names and the files cached under these cache names.

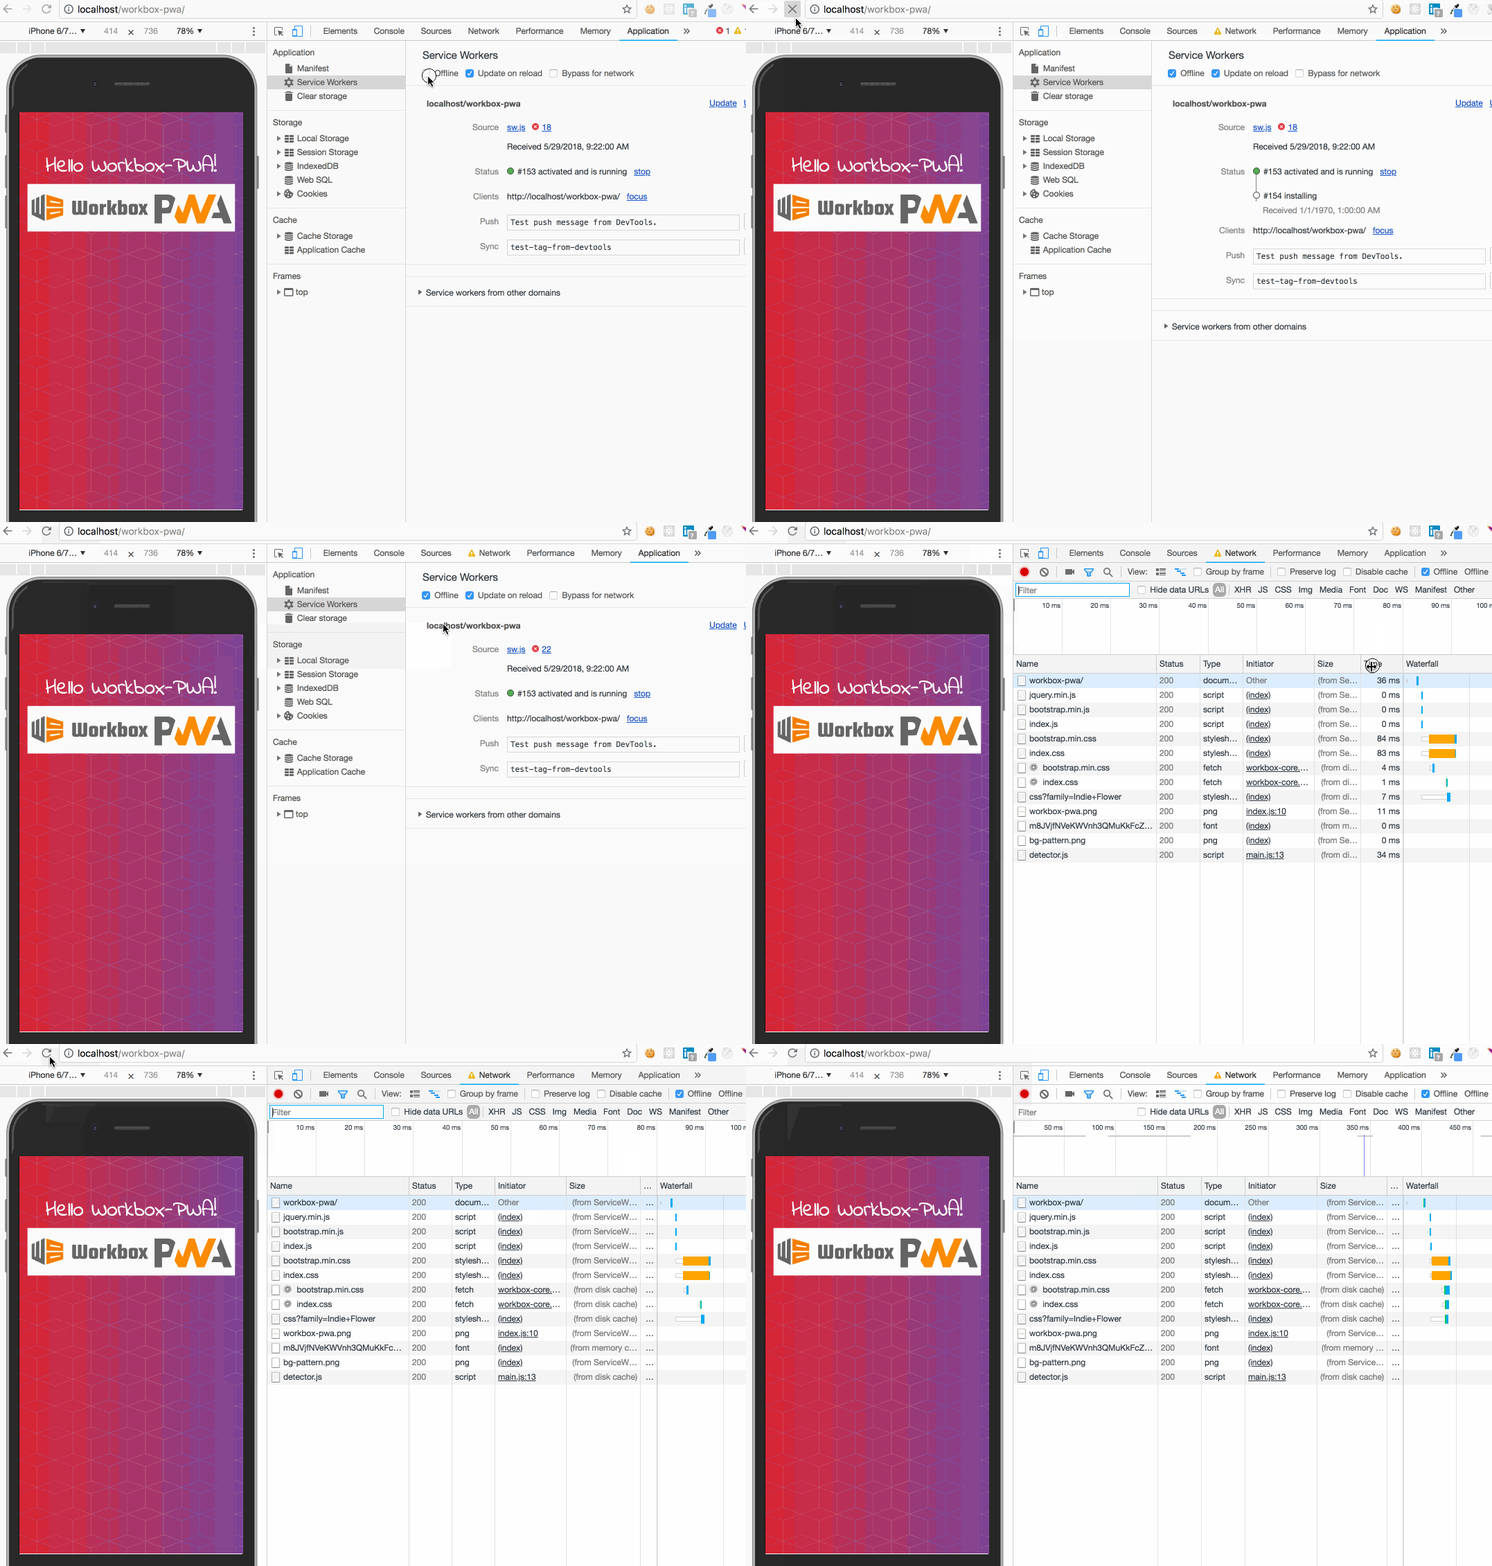
To check if the app works offline, Navigate to the Application tab in Chrome Dev Tools, click on Service Workers on the left section, then toggle on the offline option. This will take the browser tab offline, restricting access to the network, mimicking a real life device thats completely offline without access to network. That way we can assess the site for offline functionality.
Once this is done, refresh the page.

Yaay 🎉 🎉 ! Your app now works offline.

Conclusion
In this article you have been introduced to its basics and have learnt how to use the workbox library to create offline experience in a Progressive Web App by automating the caching and pre-caching of website resources using various caching strategies through instructions given to the workbox API.
Here’s a link to the Github repository:
For more comprehensive guides and resources on workbox library, check out these links :
